Archives
- Newer posts
- April 2026
- November 2025
- October 2025
- September 2025
- August 2025
- July 2025
- June 2025
- May 2025
- November 2024
- April 2024
- November 2023
- October 2023
- August 2023
- May 2023
- February 2023
- October 2022
- August 2022
- July 2022
- May 2022
- April 2022
- March 2022
- February 2022
- June 2020
- March 2020
- February 2020
- January 2020
- December 2019
- November 2019
- October 2019
- September 2019
- August 2019
- July 2019
- June 2019
- May 2019
- April 2019
- March 2019
- February 2019
- January 2019
- December 2018
- November 2018
- October 2018
- September 2018
- August 2018
- July 2018
- June 2018
- May 2018
- April 2018
- March 2018
- February 2018
- January 2018
- December 2017
- November 2017
- October 2017
- September 2017
- August 2017
- July 2017
- June 2017
- May 2017
- April 2017
- March 2017
- February 2017
- January 2017
- August 2016
- June 2016
- April 2016
- March 2016
- February 2016
- January 2016
- July 2015
- June 2015
- Older posts

Easy Code Sharing And Collaboration With Bitbucket
Every developer has experienced moments in their career when they need to share code or gain some backing when something is just not going their way. Right from College projects to working in projects in an Organisation, getting workflow just right isn’t an easy task. Writing code with another developer while working on a project as a team is a great way to absorb knowledge, challenging yourself with new perspective and ultimately delivering a better software. Unfortunately, this can be such a hassle at times and people don’t bother. It can be challenging and undesirable for remote or development teammates to share the same physical machine or move the entire workflow into a hosted environment.
Times have changed, incorporating this kind of sharing and collaboration into the workflow has been improving at a fast pace impacting how the developers work with teams touching the same code base. Bitbucket is one among the code sharing and collaboration tools that lets your team choose how you want to work with your code. You can host it on your own servers or run it from the cloud. You’ll always know where to look when you need code as you can organize the work into Teams, Projects, and Repositories.
To collaborate on code, Teams let you add multiple people to your account so you can be part of multiple teams working for different projects at once. Projects, then, come under teams, which break the work up into sections. Repositories are where you store the actual code and files you’re working on. Projects can be made private, so that they can be visible to people only in that project team.
Bitbucket includes the tools you need for working with the code. Once you’re ready with a code base, you can create a new repository or import one from GitHub. When you want to work on the project in the repository, all you have to do is clone the main repository, make your changes, commit your changes and then push them back to the main repo.
As the team makes changes to the clone ad pushes the final result, every commit has comments which help the other teammates to figure out what are the changes made, which changes to add, and what still needs to be worked on. You can view code online or download it directly, see commits, branches, pull requests, and compare the changes between each version of the commit. Bitbucket also includes snippets for smaller bits of code which can be reused later.
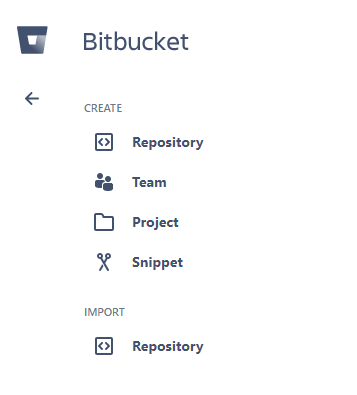
After logging in to your BitBucket account, Go to Project and click on “Create Repository” option to open up a repository creation form (see Fig. 1).
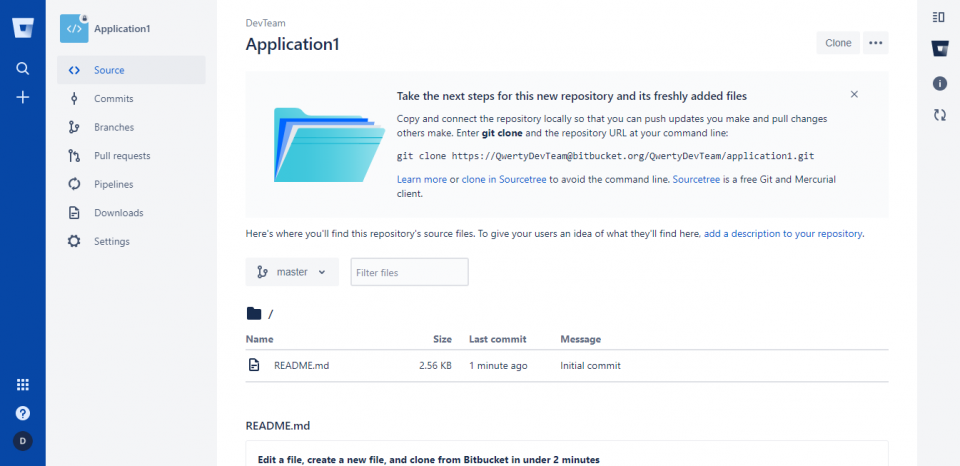
Once a repository is created it will take you to Repository homepage. (see Fig. 2).
Until the next set of instructions are followed, there won’t be any content in repository. Following are some instructions to push your project code to your repository:
To get started, you need to run the following commands in your terminal/command window:
cd <Project Directory>
git init
git add –all
git commit -m “Initial Commit”
git remote add origin <Repository Link>
git push origin -u master To collaborate and share the project code with team members, find your clone URL in the left hand sidebar of the repository homepage and share it (see Fig. 3).
NOTE : In order to grant access to users of this repository, you have to set up permissions at the parent project level.
Completing a project and turning your code into a product for the client isn’t simple, but integrating and collaborating your code with the suitable dev tools can help you work as a team more efficiently